Most RV type Conversions want multiple charging Sources. To charge “House” batteries depending on the situation. And a means to monitor the system via some type of meter.
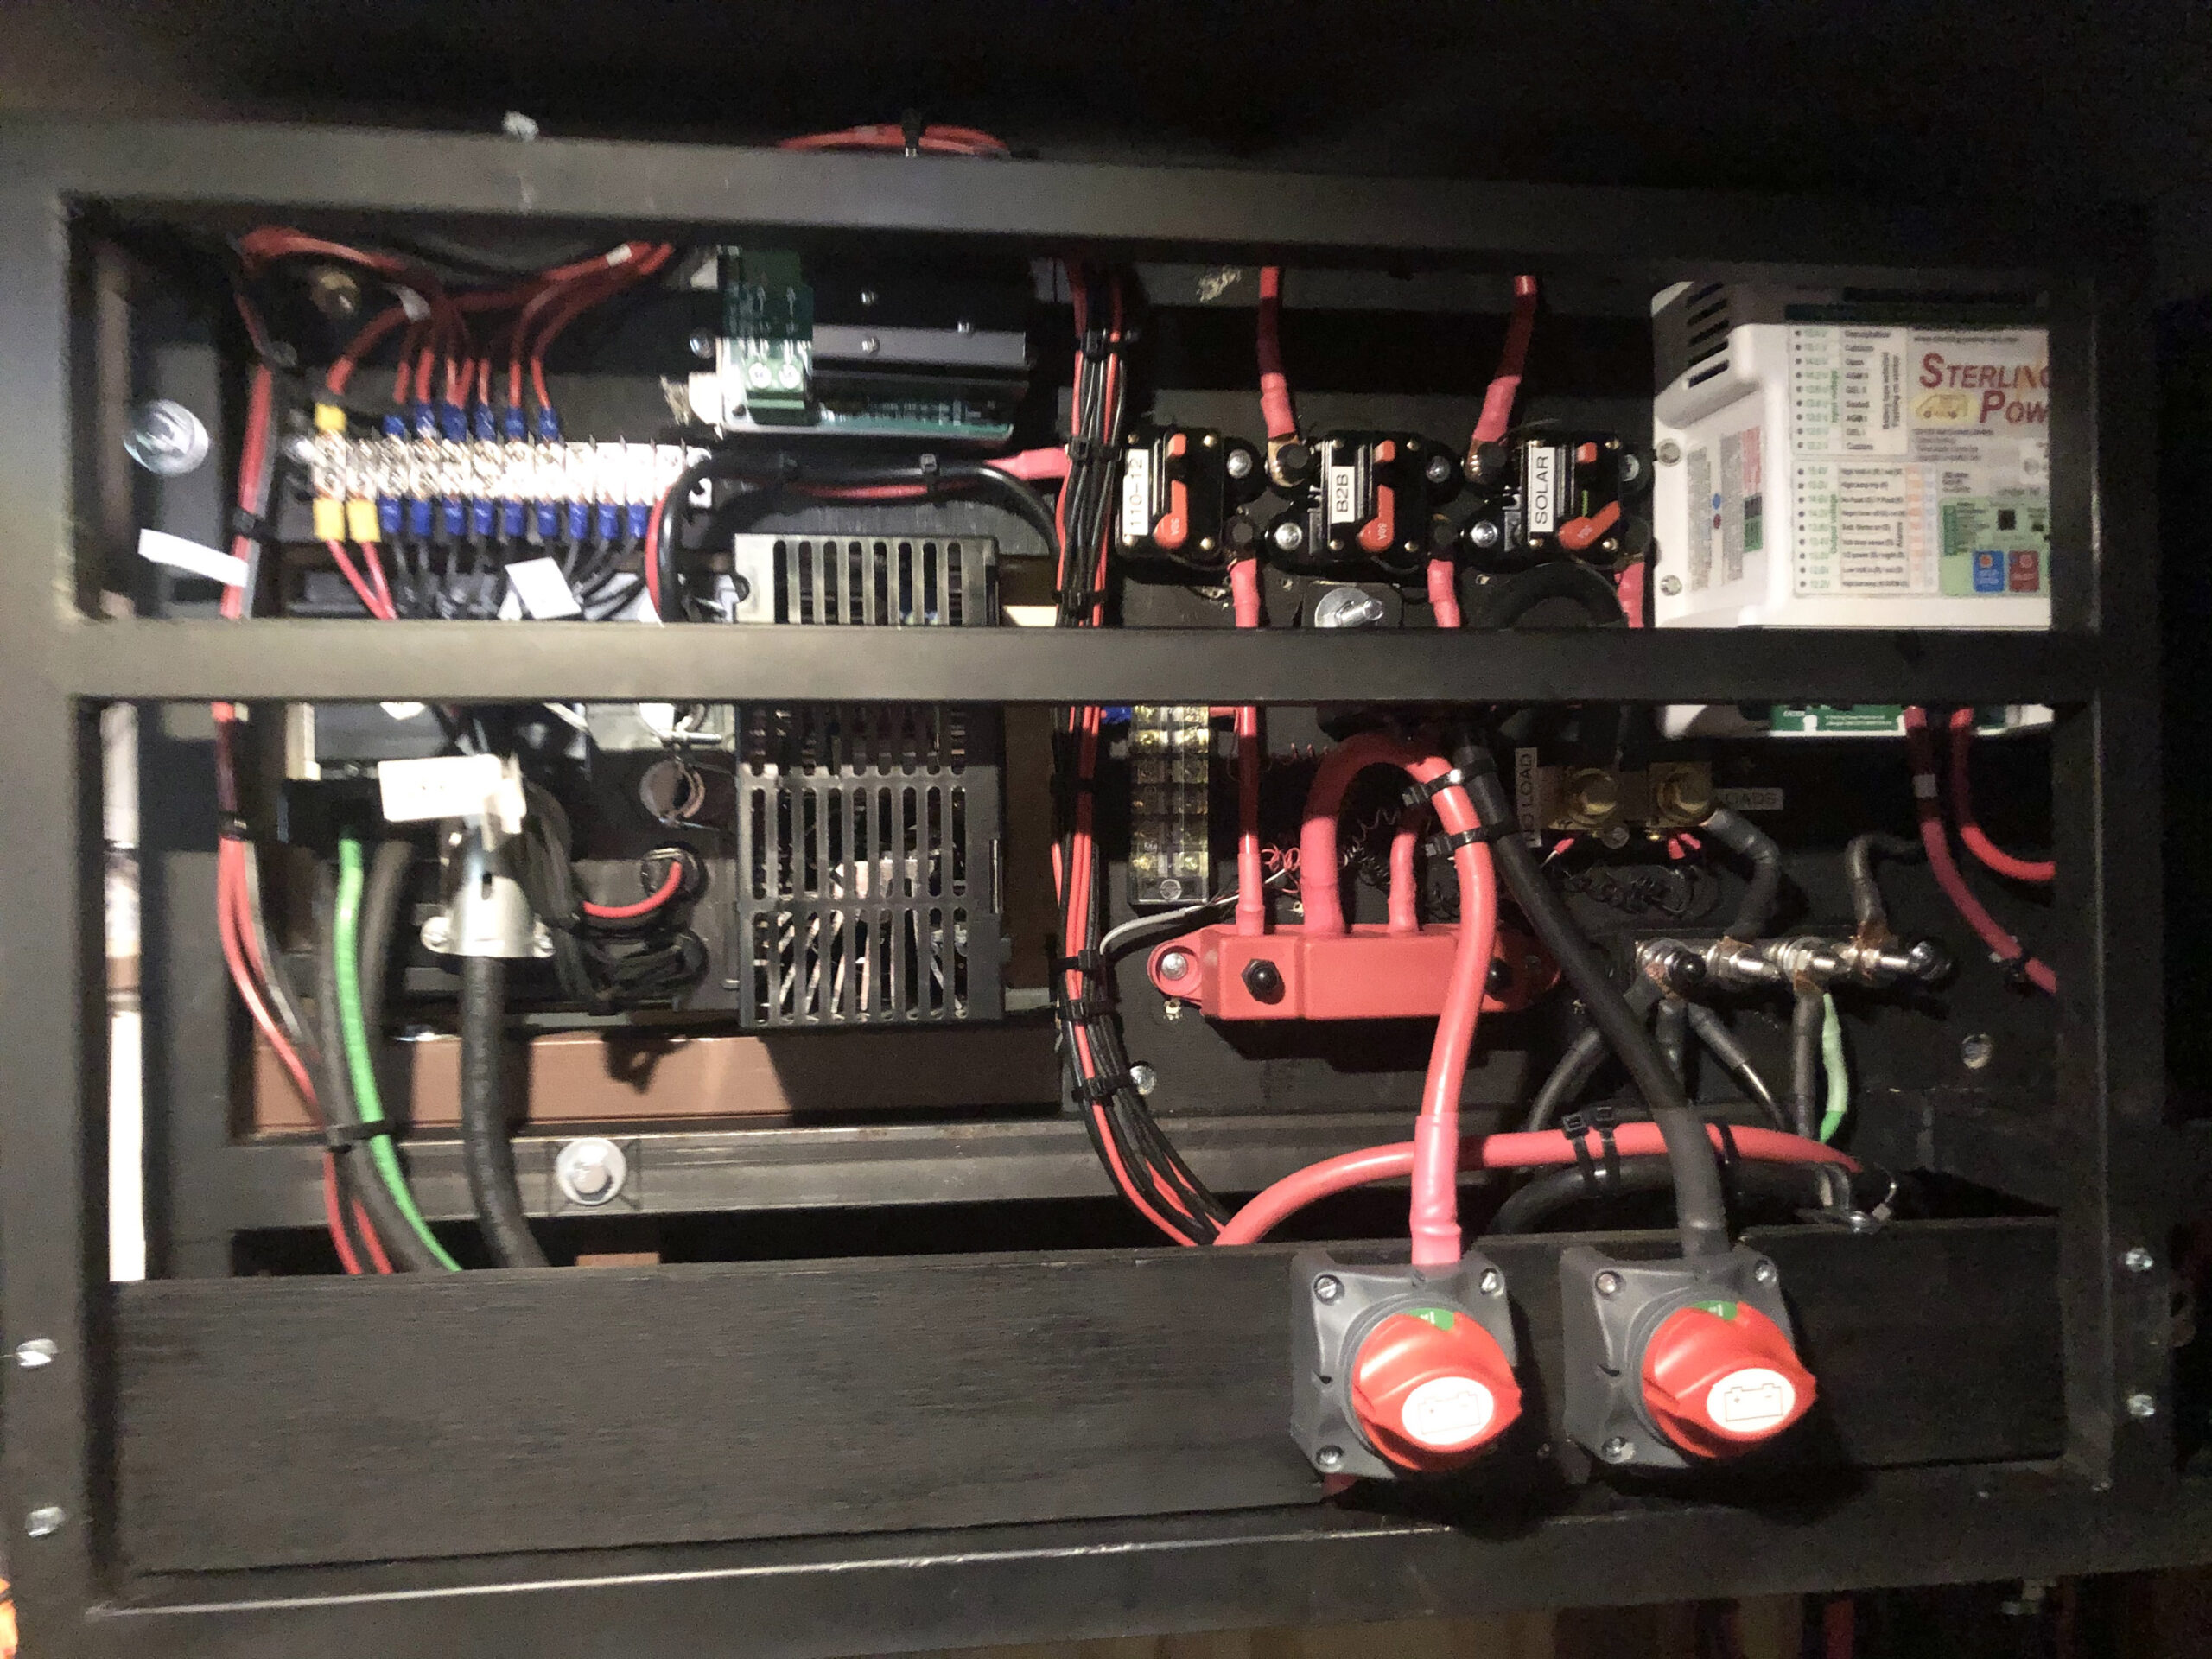
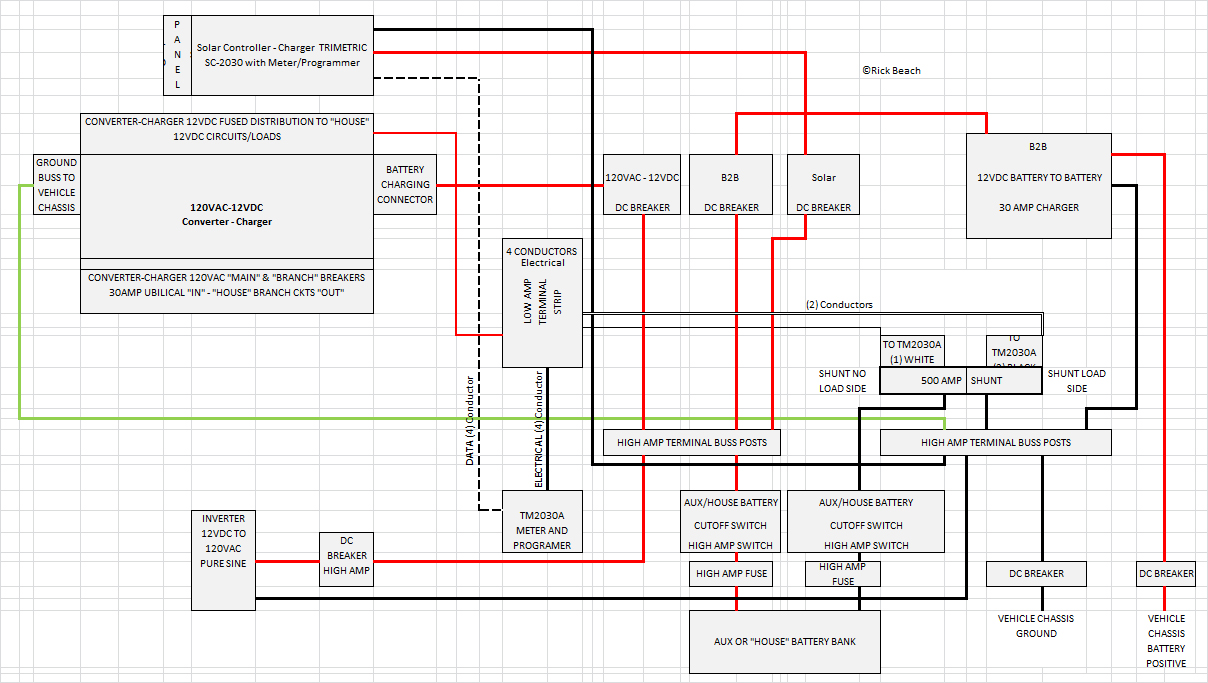
At the bottom of the article there are photos and a block diagram/schematic.
This layout is intended for those that want 3 chargers that work together seamlessly without manual intervention, such as needing to flip switches.
Charging situations:
* While Driving Down the Road
* While in a Campground with Park Power
* (Solar) Boondocking or camping with no available utilities
* Generator Connection – be it gas or a solar storage/inverter unit
While there are endless possibilities mainly based on your wallet. All are customizable to meet, your budget, your needs, preferences, chargers and battery types. Just don’t sacrifice safety to save money.
It is important before you start your design, and especially prior to purchasing components and hardware. That you know your calculated Ah (Amp Hour) use in a 24 hour period. Then you need to calculate the charger outputs, that must supply not only that minimum output to recover, but the battery storage capacity, as well a battery storage “Use” capacity …. to bridge days your individual chargers may supply, no charging, or marginal charging.
The wildcard in the 3 chargers is the Solar end of things. You have to be very conservative in your estimations. Factor in the time of year, where you travel, and the angle of your panels. Don’t expect to ever get the theoretical max charging capability off solar panels. You will never get it. Even road grime and dust on the panels will lower expectations.
We will show a rather basic system. In the low cost end of things. Not counting Solar Panels, wire runs, load receptacles, load device, or Umbilical Cable.
This 3 way charging configuration including the house batteries, and about 200 watts worth of reasonable priced solar panels. Will run about $1200-$1500 in material (2021 prices). This money builds your basic power board with its components listed below: If you are modifying an existing RV that already has a Park Power Converter-Charger, that will save you $
Many small components such as DC breakers and fuses are mandatory for safety, as well as ease of troubleshooting some type of fault later on.
Major Components of the power backboard:
B2B Charger Sterling Power
Progressive Dynamics PD4500 120VAC to 12VDC Converter-Charger
30 Amp Solar Controller-Charger Bogart SC-2030
Meter to display battery/charging/programing Bogart TM-2030
500 amp Shunt for metering capability
Various 120VAC Circuit Breakers – Main, Branch, GFI Circuit(s)
(2) 100Ah 12V AGM Batteries (Total 200Ah Storage)
30 Amp Umbilical Receptacle
(2) High Amp multi-stud buss terminals
(2) High Amp Shut off Switches
Various Copper Terminal Lugs to crimp solder and heat shrink
Various DC Circuit Breakers
Various High Amp Fuses
CRITICAL RULE: Do not mix dissimilar battery types on a charging source. This is critical if you attempt to charge your “House/Auxiliary Batteries”, by connection to your vehicle charging “Starting Battery”.
There are devices that will solve this dissimilar battery issue. But not ignition relays, a direct wire connection, or many of the standard passive battery isolators. With those you will have to match all the batteries.
To use dissimilar batteries, research “Battery to Battery chargers”. Those that auto sense the output side (House/Auxiliary), then adjust to the proper charge characteristics. Of course, the House/Auxiliary bank must be made up of the same type, size, and characteristics. Some will even suggest or argue multiples to create a battery bank, need to be of the same age as well.
First of all a disclaimer. I am biased and prefer solar components from Bogart Engineering. For their rugged construction, ease of installation, longevity, and their ability to be custom programmed if you want to go above and beyond default settings. The default settings you will find, are more than adequate.
The Solar Controller I use is PWM. It can achieve the same charging results as a MPPT via programming. So don’t get sucked into something unknowingly just because there are strong voices out there for other products. I know the arguments well.
Bogart’s components have held up well to vibrations from the road, and desert heat of southwestern USA. In hot temperatures of closed up vehicles often sitting in direct sunlight and air temperatures exceeding 115°F during the summer.
My solar controller-charger is limited to “Flooded’ and “AGM” I would not purchase the one I use, if your intentions are to have “Lithium” batteries either immediately, or at some future point.
The PD4500 I use is an older model. It is not Lithium compatible without an upgraded circuit board. It doesn’t matter to me since I used, “Flooded”, and also “AGM”. Cost verses use at this point in time, to go Lithium, does not make sense in my case.
Most older Progressive Dynamics, WFCO, and other brand units, found in older RV’s or Travel Trailers, may not be Lithium compatible as is.
If you are building for Lithium, be careful what you buy on eBay or Amazon. I believe that older models are being dumped on some of those types of platforms. Make sure it is specifically Lithium compatible. Then by all means double check it first, when physically in your hands, before you waste time installing it.
There are many manufacturers out there to research, and select from. Do your homework. But keep in mind the availability that might arise when a component fails while you are “on the road”. Think parts from big box stores, or chain camping supply retailers that are readily available across the country. Sure it might be more $ up front.
I want a remote mountable meter too. Controller-Chargers with everything built into the single unit, and limited as such, aren’t for me. I want the SC near the rest of my electronic, built out of view. Then an extended “wired” meter located in some convenient viewable location. Preferably from the ground when opening the door. In the case of a driving vehicle (Non-Trailer scenario), viewable while driving, and also when set up camping.
Things are changing and Wifi compatible devices are becoming popular. I personally want something simple. Basically plug and play, no need to program anything, no high tech Wifi connection that may just become a headache when I am out trying to camp, and actually disconnect myself from the tech world.
All power cables, terminations, devices for both 120VAC and 12VDC, and Inverters, will be additional costs. It would be be impossible to provide any type of guess-t-mate. Much depends on wire gauges and distance of your wire runs. Component you select. Even your desires for what your system can do. Don’t forget about the 30 amp #10 Umbilical power cord you will need if connecting to Park Power. Then there are 50 amp Park Power options too.
Planning your layout is a very important step. Even if you are adding in steps while perhaps using what is working. Draw out your components and wire runs on what will become your power backboard. Solve layout there before you start mounting components and actual wires.
A do over of your existing, to add upgrades later. Things like, requiring heavier cables and terminal lugs, can get costly real quick too.
Can you eliminate some of the stuff and do it cheaper? You betcha. Would I? Absolutely not. I build with safety in mind. I don’t want to burn my rig down. Anything works, even a substandard install, until it doesn’t.
I want components that provide easy troubleshooting or “isolation points” that will allow you to shut off a portion of the system in case of a component failure, but allow you to still function off what may remain functional. The minimal cost increase is well worth it in my opinion.
Kind of like arguing safety and convenience, with someone that doesn’t want to sink the money into their electrical system. Some are satisfied with simply throwing an extension cord through the window to power up their rig. While others are never going to take that approach due to electrocution safety.
There are actually codes in the NEC (USA National Electrical Codes), in a Recreational Vehicle section, that has specific language once 120VAC is brought on board. Things like “Minimum point of entry for a proper main circuit breaker”, and “chassis grounding” off the 120VAC with a minimum of a #8 copper.
Two very important basic requirement many DIYers either do not know about, understand, or choose to ignore. Things that places that provide Park Power hook-ups, are taking more and more the approach of not allowing DIY builds. Rightfully so for their protection, and the protection of other rigs in their campground. I see this over time being regulated and enforced at a higher degree. Probably eventually filtering out into insurance coverage too? Perhaps eventually making it impossible to insure a DIY build?
This 3 charger system is easily adaptable to charge “Flooded” or “AGM’ type house batteries. Altered to match up, by setting charger manual selection switches, to match battery type involved.
In the case of the B2B Charger shown, it is auto adaptable to most any battery type used on the output side. Even Lithium.
This is a 12VDC system throughout. As far as DC is concerned.
There is no DC conversion is necessary, such as 24VDC or 48VDC, to 12VDC. Or to feed an Inverter that needs a 24VDC or 48VDC battery source. Or panels that put out something other than 12VDC.
Using non-12VDC components just adds another layer of complexity. The average DIYer had better leave the design of such a configuration, to a Professional. Most likely the Installation too.
This system with some of the components shown in this article, is not compatible for lithium batteries. Different Charger components and Batteries would be needed. To go Lithium. The chargers would need to be lithium capable, properly set to match Lithium Batteries. Something to consider if your eventual want, is to have lithium. Better to bite the bullet up front and build a more expensive lithium system. But be aware there is considerable more costs involved. Also this info is not geared for those going Lithium.
Is Lithium the best way to go? Hard to tell. It certainly provides bragging rights that your system is bigger than the next persons. It is certainly going to be more expensive!
Lithium might be a the way to go if you are a full timer, someone that consumes excessive amounts of power, or has little desire for being frugal.
For the average weekend camper or long distance traveler, “Flooded” or “AGM”, and a couple hundred watts worth of panels, can easily provide perpetual boondocking capabilities. I have used such a system (flooded – batteries exterior mounted) since 2011 (as of 2021) which even powers my high efficiency fridge/freezer, and a microwave. I never feel like I have to be frugal.
Another system I built in 2020 (AGM Batteries) is also providing me more than adequate power. I only went with AGM verses “flooded” because I did not want to mount the batteries externally.
NOTE: You do not want “Flooded Batteries” in the vehicles interior living space. Any interior flooded battery compartment has to be sealed from the living space, and vented to the exterior. So in most cases vans are using AGM’s, or something better, that are also sealed and don’t gas off any hazardous or explosive fumes.
The 3 chargers that are integrated together in this example. Will perform while they are all on. Eliminating transfer switches, or cut-off switches you might otherwise think you need to add. This configuration eliminates the need to turn anything off or on, having to do with any of the multiple power sources.
The B2B not only serves as a charger. It will solve the dissimilar battery type problem often encounter between your “House/Auxiliary”, and your vehicles battery type.
The proper B2B also eliminates the need for a high amp ignition relay between chassis and house batteries. Or a passive battery isolator to accomplish the same function. Such components that won’t solve the dissimilar battery issue.
One of those devices would otherwise be required between your chassis battery and the house/auxiliary battery bank. For isolation. Unless safety, or being stranded with a dead vehicle starting chassis battery, is of no concern to you?
The addition of a B2B will give you gobs of more amp charging capabilities, driving down the road. In a short time frame. Verses a direct charging feed in parallel off your vehicles charging system.
Three Chargers are used:
* B2B (Battery to Battery) Charger via the Vehicle Chassis System
* 120VAC to 12VDC Converter-Charger Connection to Park Power
* Solar Converter-Charger Using the sun when Utilities not available
The 120VAC to 12VDC Converter-Charger portion (120VAC Umbilical Cord) can be plugged into an adequately sized Portable 120VAC Generator as an alternate source of power and charging.
One note to mention concerning this configuration shown. A “must have” for me: The “House” loads on both 120VAC and 12VDC are all run with individual “hot” and “ground/Return” conductors.
I forgo using a common “chassis” ground, to eliminate running an actual conductor for that purpose. Yes it adds some additional cost. In this webpage we will refer to this configuration, as an “Isolated House System“.
The Isolated House System serves a couple of purposes. All having to do with safety. The isolated 12VDC house system can be easily shut off, or taken off line, from the House battery bank, in case of an electrical issue.
Likewise if you are having your vehicle chassis systems worked on, vehicle warranty work performed, or troubleshooting a chassis electrical issue. The isolated “House” system, including all the chargers, can be completely isolated from the Vehicle Chassis Electrical systems such as the Vehicle Starting Battery, Vehicle Alternator, and the Vehicle’s factory electrical system, and chassis ground. That way you won’t get a bill from your vehicle mechanic for something they may spend hours on, to find out some fault is in your “house system” build.
If you can’t isolate your house electrical build. A chassis mechanic tracing such a fault, may not troubleshoot into your “House” system for you. But you will certainly get a bill for the time spent getting to that point. Depending on who did the electrical on your “house system”, or a DIY. Any fault may be up to you to figure out, or pay your “Upfitter”, or specialist, to make the repair. Often no schematics or wiring diagrams are provided to the vehicle owner.
This Isolated House System also provides necessary electrical legal/safety components, as well as “nice to have” electrical components on the 120VAC side. It provides various safety components for both 120VAC and 12VDC. At the same time providing a neat and compact area to terminate all your wiring. Both 120VAC and 12VDC.
Advantages incorporating a 120VAC to 12VDC Converter-Charger:
120VAC Main Shut off-Circuit Breaker at minimum point of entry (MPE)
120VAC Branch Breakers and GFIs
120VAC Required Vehicle Ground – Power to Chassis
12VDC Fusing and Distribution
“House Battery Bank” Main Shut of Switches
Various 12VDC Re-settable Breakers for major components
12VDC Re-settable Breakers to isolate House from Chassis
Note of caution: This is only an example. We are not responsible for errors or omissions.
There is much not shown that is required to build an actual working configuration. Electrical knowledge of codes, proper wire types and gauging, proper mechanical connector practices. Knowledge of grounding, fusing, and breakers both 120VAC and 12VDC. If you don’t know what you are doing. Use a professional.
The below diagram is a simplified block diagram for conversation purposes only. Wire/Cable gauges are not shown. All necessary ground connections are not shown. Not all fusing or breakers are shown. No “House” Loads both 120VAC and 12VDC, other than powering the shown components, are included.
There is also isolation capabilities on both the positive and negatives that many may not understand? On both the “House” battery bank positive and negative, as well as the vehicle chassis starting battery positive and negative connections, and the 120VAC power to chassis ground. All so this system can be totally taken “off-line”, isolated from the vehicle chassis electrical system, even the “House” battery bank, when vehicle warranty or vehicle mechanic work is being performed.
Disclaimer: We are not responsible for errors or omissions, or for use of any of this information to build your own system.
![]()