This method uses the factory interior plywood left in place. This method is desirable for several reason. It Reduces time and Labor, provides Structural support, allows the use of lighter finished interior panels, maintains an air gap between the exterior metal skin and interior, when installed as below it virtually eliminates any condensation issues.
Electrical conduit is also concealed in the space this creates. The left-in plywood also provides a backer to electrical receptacle boxes.
Note: I suggest installing double boxes [2 Gang] at each receptacle location. Split wire runs back to the breaker panel too. That way, each single gang receptacle, in that double gang box, has its set of wires running back to its own individual GFI branch breaker, neutral, and ground. Following what is code for kitchens in many places. The idea is, if you have two high wattage/amp draw devices plugged into the same outlet location, they aren’t on the same wire, or same branch breaker.
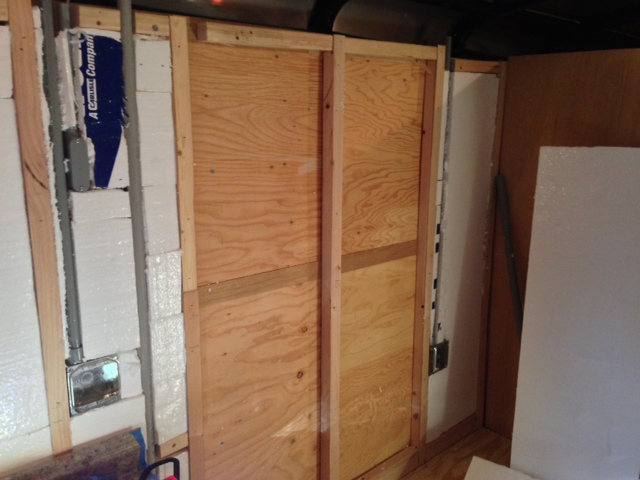
The existing interior plywood is furred out with wood stock ripped to exactly 1 1/2 x 1 1/2 Inches. [Note: Exact dimension of your foam insulation]. The furring is attached vertically centered on the vertical metal trailer ribs behind the plywood. This creating vertical studs.
The Furring Studs are attached using construction adhesive. Then screwed through the furring strip, the plywood, and into the metal rib using a pan head self drilling/tapping screw. Or a countersink hole, hex head self tapping screw and a washer. [Pilot hole drilled first in either method] The vertical furring strip is screwed with a minimum of 3 screws. Middle and about a foot above the floor and about a foot below the top.
When drilling from the inside into the metal vertical ribs, use a drill stop to avoid accidentally punching through the exterior skin. This can be a metal collar with a set screw, made for that purpose. Or a simple block of wood cut to the required depth, with a guide hole drilled into it.
1 1/2 Rigid Foam insulation is cut so there is a snug fit. It is pushed in and should be exactly flush with the interior edge of your furring strips. This is important to give you structural support behind your interior finished panels. This allows you to use lighter materials such as FRP board, or 1/8 inch Luan Plywood.
Any minor gaps around the edges of the rigid foam. should be spray foamed to fill. Any spray foam should be allowed to set, then trimmed flush. This helps prevent any condensation developing inside the wall.
Ceilings are done in a similar fashion. Though most cargo trailers do not come with interior panels attached to the underside of the metal ceiling ribs. In the case of mine [Interstate Brand]. They have 1/8 or 1/4 plywood between the exterior ceiling skin, and the top side of the metal ceiling ribs.
1 1/2 Inch furring strips are run the length of the trailer, perpendicular to the metal ceiling ribs. Place these 16 inch on center. Place your first one dead center of the trailer. Then go out from there 16 inch on center.
Having your ceiling furring strips in place before you start installing any floating wall partitions makes things go a whole lots smoother.
Another note. Build yourself a giant “Square” out of wood so you can get everything perpendicular to the floor. Having two giant squares will even more handy when securing partition walls. That way your walls, door frames, and windows will be installed correctly even if your trailer and floor aren’t perfected levels each time you do your rough-in construction.
For my two squares I used a 3 ft piece of 2×4 for the base, and a piece of 2×4 for the vertical just shy of the lowest point at one of my curved ceiling ribs. I next cut a right triangle out of 1/2 inch plywood, with 2 sides at 3 ft.
Attach the 2×4 base to the 2×4 vertical to create an “L”. Use a real framing square to square up the right angle of the 2X4 “L”. Then screw the plywood triangle to the 2×4’s to secure that angle.
Working alone most of the time, I found these giant square invaluable. I could temporarily screw them to the floor if need be. Then use clamps to hold things in place while I drilled or screwed other parts together.
![]()