Your fresh water system will give you plenty of points to think about. Planning and design are critical. Will you camp in freezing conditions? Do you want a pressurized system easily adaptable to feed your hauled water, or city supplied pressurized water?
Failing to plan or think about potential long range wants may have you ripping out plumbing and redoing it.
Lets look at it from a perspective that you want it all! Just like the big boy commercially built rigs. Since you are doing this yourself you might want to go a few steps further, doing it even better.
Lets list your wants.
- A system that delivers pressurized “Cold” & “Hot” Boondocking or not.
- A system that can withstand freezing temps as long as the interior is heated
- A system that is easy to drain and winterize.
The typical RV “pressurized” system is really a dual system. Two available sources of fresh water can be used.
From a on-board fresh water storage tank that is installed in/on the trailer. Through out we refer to this as Tank Water.
Or from a pressurized source such as pressurized City Water or pressurized Camp site utility faucet water. Through out we will refer to this as City Water.
Building a system to withstand freezing overnight temps when camping requires much thought before starting any interior partition framing. Basically running all water supply lines, drains & vent pipes above the sub floor. Of course black & gray waste tanks for the most part will be below the sub floor.
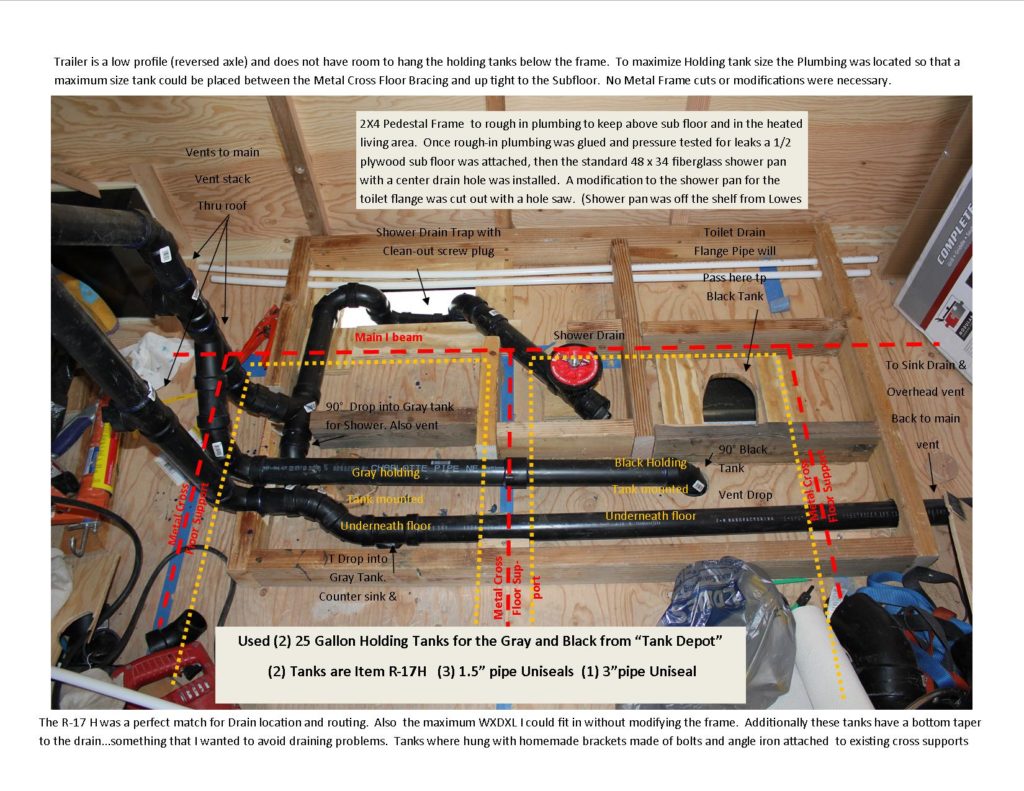
Shower stalls and RV Toilets are raised somewhat on platforms [minimum of 3 1/2 inches to allow water lines, drain pipes, and vent pipes to pass under the finished shower pan finished floor. Unless your waste tanks, below the sub floor, are completely full. Freezing at night will not damage them. Unless you are talking extreme freezing conditions. Often you may have Park utilities and your sewer line can be left open and draining. Heat tape could also be used on the exterior.
To design a system that drains properly without needing to “blow it out” to winterize, takes really good design planning, and proper materials. Running everything slightly downhill to a drain point. It is suggested you install a 3 valve bypass at your water heater. Also 3 drain valves ideally off the lowest point of your system. A “Hot” water drain. A “Cold” Water drain. A “Tank” Drain.
If you work backward from your “Fixtures” such as your sink or shower faucets. This part of your plumbing is “Common” concerning water pressure. Common, regarding the pressure source may be your RV Water Pump, or City Water Pressure.
Lets run through the cold water side first. Obviously if you have two sources that become common somewhere along the pipes. You have to have a “T”. Two inputs, one out put. If it were that simple it would be easy to explain. But this system has to work when one of the inputs doesn’t work, or is disconnected and open.
For example there is no hose hooked between your trailer system input and the City Water. Your RV Pump is the pressurizing mechanism. It turns on, but magically that pressure does not shoot water out of the trailers input connection for City Water. Sure you could put a cap on that pipe to prevent it.
Typically RVs to not use a cap to prevent this. That is because the City Water input of your trailer system needs to have a one way check valve installed. These check valves may be nothing more than a gravity activated flap valve. So some thought has to go into routing this plumbing so the check valve is mounted vertically, and in such a way it closes and says closed at the proper time.
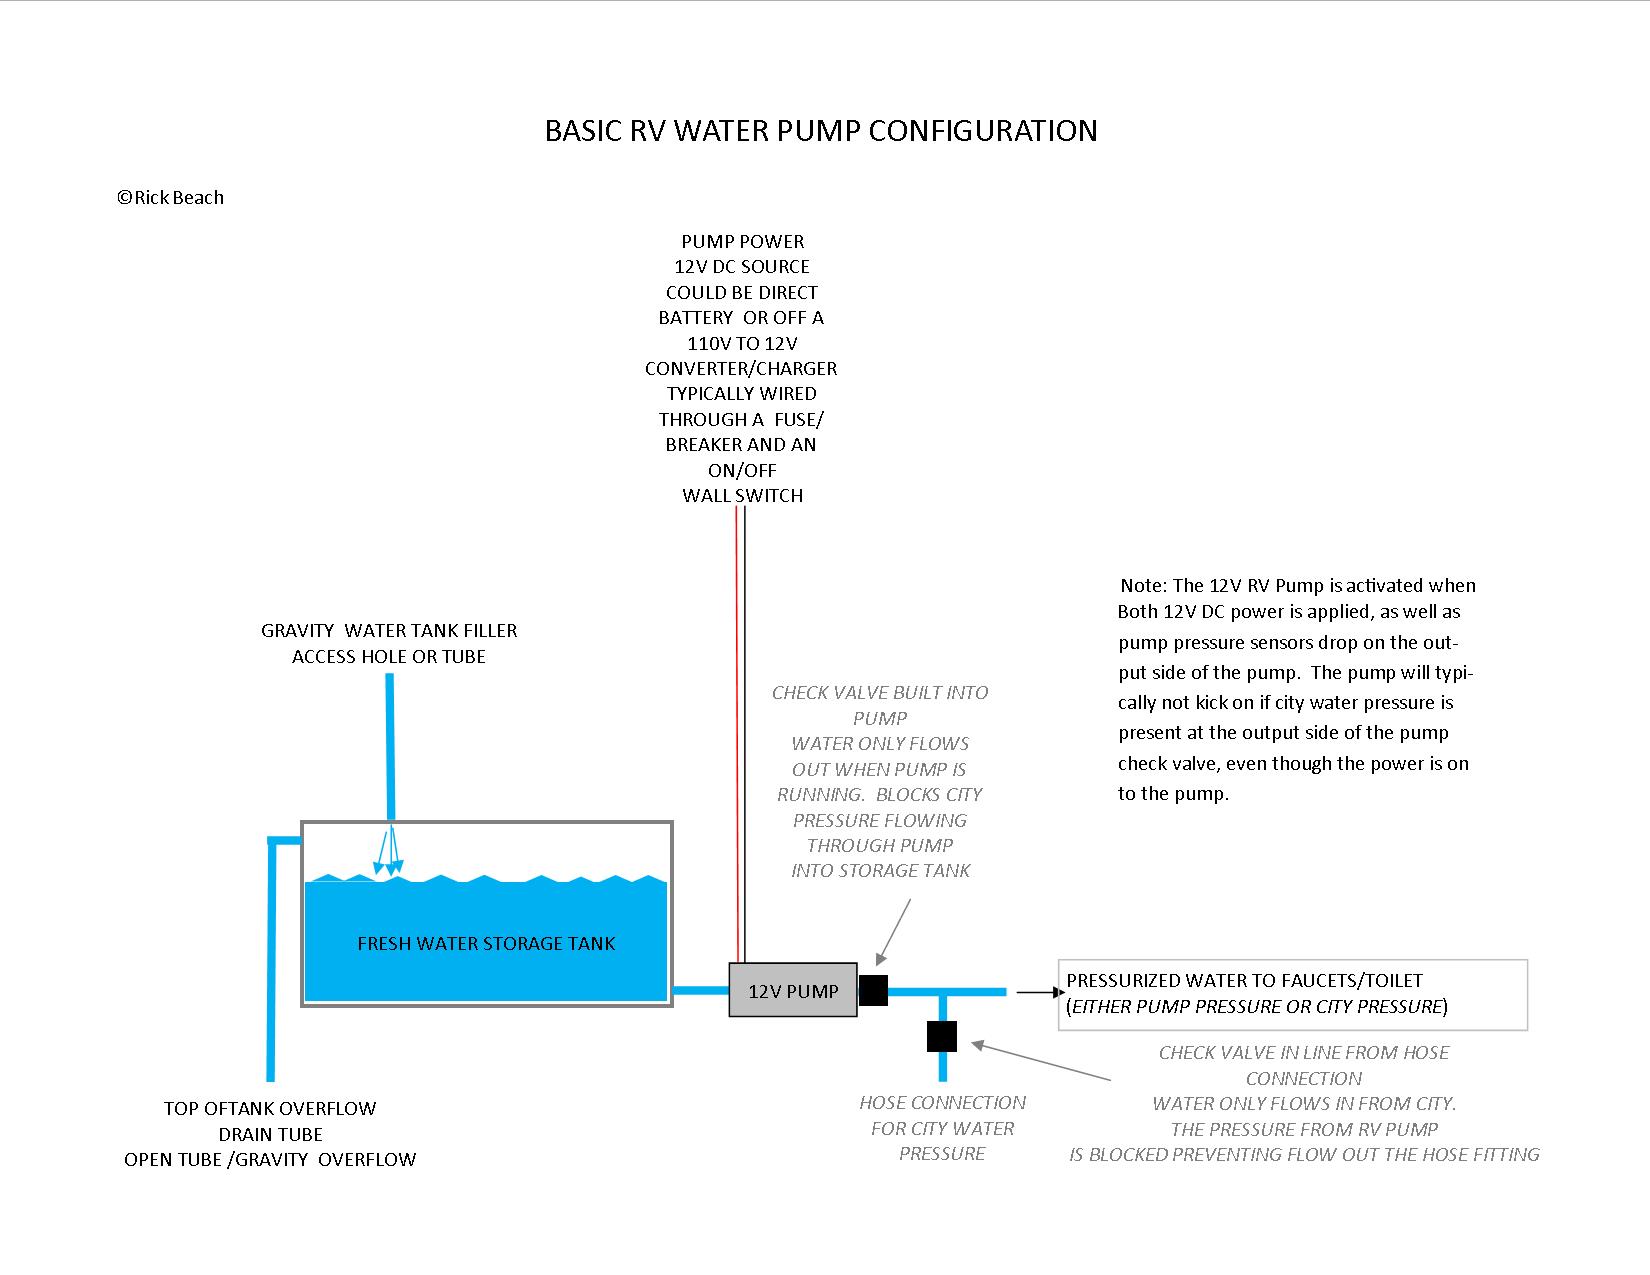
Inversely lets say you are camping where City Water is available to “hook up”. The City Water is the pressurizing mechanism. Your RV Water pump stays off. You hook your hose between your trailer City Water intake pipe, and the City Water faucet. Then you open the faucet on the City source. Magic happens again. That water pressure doesn’t back flow through your RV Water Pump filling and overflowing your on board water tank. Why? There is another one way check valve on this input source. In the majority of cases with modern RV Water Pumps, that check valve is build into the pump itself. Worse case scenario you would have to install a second external check valve properly positioned.
All of this means you will have two water “fill” or connection sources on the side of your trailer. In the USA put these both on the Drivers side. One will be a gravity fill to your on board Water Tank, the other will be a Female hose connection for attaching a hose to City Water. RV parts supply have access doors with both inputs inside a gravity fill and a hose connector for City Water. Most also have a vent you can run a line to. Get the lockable type. Some of these can be purchased with the City Water Check Valve built in. I personally install an independent brass check valve to avoid problems some of the plastic ones have.
Your on board water tank must have a vent/overflow as close to the top of the tank as possible. We recommend you T it right off the tank before extending it to the Water Fill access door vent connection. The other side of the T has a tube routed straight down through the sub floor to hang a few inches below the floor and frame.
The “Hot” side of things, to all your fixtures, comes from the output side of your water heater. The input is a straight feed from after the “T” that connects City Water and the RV Pump Water, and beyond either of the two check valve points.
![]()