After using or working with several materials & methods of insulation [trailers] over many years. We found that rigid foam is the best overall for the DIYer. We are talking for Trailer Conversions. Not Vans.
Especially when you factor in cost, application/installation methods, space used, tools, availability of material locally, ease of installation, and most importantly your insulation factor and condensation elimination.
We could add a whole article on condensation issues. Condensation that trailers and small enclosed spaces in general generate when warm moist air hits a cooler surface. The only way to stop that is to insulate and eliminate air or gaps within the insulating space.
Think back to your days of camping in a tent on a cold night. Those conditions when your body and breath produce moisture and warm up the inside of the tent. Even slightly warmer than the outside temps. When you wake up in the morning the inside of the tent is covered with moisture or even ice crystals.
It is created when warmer moist air meets a cooler surface temperature.
You want to eliminate this from happening in your trailer. A simple metal skin, and nothing else to insulate it, will generate this effect even more-so than your old tent.
Rather than going into all the detail about other methods we think are far less effective. We are going to cover the method we have found works the best for us. Both for heating and cooling. At least in our Cargo Trailer Conversion, and the wood backing configuration we had to work with. Bare metal or Vans present other concerns.
We do want to touch on one method we don’t recommend for this configuration. If you are thinking of spun fiberglass as insulation, please research and reconsider. Especially if it will be installed touching the interior side of your exterior metal skin. That method has been an epic fail on a previous project.
Our theory is some air must breathe through to the fibers from the inside, to condense on the metal skin surface. If there is not wood backing and an additional air gap.
Moisture gets trapped in the insulation gap between the interior finish and the interior side of the vehicles metal skin. Apparently enough moisture that can’t breathe to vent enough to dissipate.. Some moisture does collect on the interior side of the skin surface. Regardless of the metal skin type, Steel or Aluminum, that scenario can set you up for rust or corrosion. Many cargo trailers have metal vertical ribs that would end up in the same space. It can become a sopping mess if you have no wood/air gap.
We do want to touch briefly on a method that may be far superior to ours, but the cost factor, and possible metal skin corrosion, makes us not go that route.
Spray foam insulation seems like it might be far better? Due to the fact it would fill every nook and cranny, and seal off any chance of interior air contact with even the smallest area of the metal skin. The cost is the factor that eliminates this method for us. Also our personal unknown and concern that direct contact of spray foam against the metal skin, might become a corrosion factor due to chemical reaction between the metal skin/paint and the foam material?
Cut foam panels might function great in a trailer but not a van? In the trailer you won’t be riding in there while traveling down the road. Any noise or squeaks the foam may generate due to movement will not be an issue.
Attempting to use cut Rigid Foam panels in a Van…well that might be a problem. Each and every piece of foam would need secured with foam or some type of adhesive to avoid any noise. while bouncing down the road. That might be an epic fail if you find out you have to start tearing out your build to keep from going insane listening to squeaks while driving.
If you start foaming or gluing these panels in, will you create corrosion issues with your vehicles metal or paint? All questions that need factual answers.
Rigid Foam Insulation
We use rigid foam insulation panels for our insulation material in our Cargo Conversion. Cut to fit snug, and any gaps to the 4 edge cuts sealed using a can of expanding insulating foam.
While your individual framing and construction methods differ, you should be able to work with this material. It requires nothing but some common tools, and just common sense. We use it on our walls and ceiling.
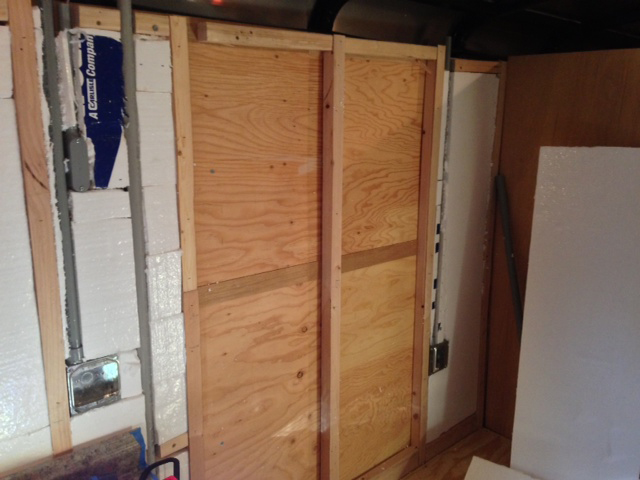
Our cargo trailer came from the factory with interior plywood walls. The factory configuration creates a air gap between the outer metal skin, and the interior plywood panels. The vertical metal factory ribs are sandwiched in between.
Our factory ceiling came with the metal roof supports, 1/8 inch plywood material on top of that, then the exterior metal skin laid on top of the thin plywood. The metal roof supports on the interior underside where completely exposed.
We leave everything in place as it came from the factory. If you are thinking you want to tear it out to reduce weight. That might not equate to what you think either. The factory installed plywood provides lots of structural support. Furring out on top of it allows you to use lighter materials on your finished interior.
We fur out the walls with vertical wood studs the exact depth of our insulating panels. Mounting the furring strips vertical at each vertical metal rib. Ours happened to be 16 inch on center.
Our ceiling is furred with wood furring the exact depth of our insulating panels. Run perpendicular to the factory metal roof supports. The wood furring strips screwed into the factory metal roof supports, at 16 inch on center intervals. Starting first furring strip dead center the length of the trailer. Then adding out from the center, on both sides. This allows you to later split your finished interior ceiling panels at your ceiling center, should you want that. We found that ideal.
We have found that 1 1/2 foam is more than adequate to accomplish your insulation for all area’s and seasons. Unless you plan on camping in sub-zero conditions.
Since we use 1 1/2 inch foam, our furring strips are ripped exactly to 1 1/2×1 1/2 so once the foam and furring is installed they are perfectly flush. This is important. You want this totally flush to allow your interior finished skin to be of a thinner and lighter material. We finish with 1/8 to 1/4 inch panels. Luan, FRP, or Prefinished white hardboard. The flush foam/furring will provide your thin finished interior great backing you otherwise would not have.
We also run all of our electrical in PVC conduit. Both our 110VAC and 12VDC. This 1 1/2 depth allows for mounting standard electrical boxes. We suggest 4×4 boxes with 1/8 plaster rings at all locations. Whether you use single or double gang rings. Remember your lights, switch locations, water pump switch, Air Conditioner, exterior outlets, exterior patio light, and even a coax run for a possible TV.
Once the electrical conduit runs are all in place. [We fish our wiring through the conduit after our finished interior panels are installed] We install our rigid foam panels in the ceiling and walls. We then use a can of expanding insulating foam to seal any small gaps around the 4 edges of every rigid panel.
If you are insulated in this manner you have an air gap between your metal skin and the exterior side of you rigid foam. You have the foam insulating factor between your interior air, and that skin air gap.
We have used our 8.5×16 Cargo Conversion in outside air temperatures down to 16°F, using a 1500 Watt 110VAC Ceramic heater to keep us comfortable. Our floor is not insulated other than carpeting. Our rear draw bridge door is not insulated and is still just the factory plywood on the interior as it came from the factory.
![]()