
We wanted to installed swivel adapters on the two front factory stock seats of our Sprinter Van.
The install info on the swivel is about half way down this page.
Our Requirements and Cost
Doing some on-line research there appeared to be at least 4 top choices that were rated. We eliminated any that appeared wiring cutting and splicing would be required. In fact should the unit we purchased require that, we will most likely return it. Not that we are not capable. We don’t want to hack into the seat/seat belt wiring and start voiding factory warranties.
We also eliminated some that others are complaining they cause vibration noise when driving down the road, with the seat unoccupied. That will be a big no-no for us.
The added minimum seat height change inserting one of these creates, was also an issue of concern, Our tallest driver is 6 ft.
Next we took those left and boiled it down to 1 based on how numerous people were rating various swivels. We didn’t factor into the mix the cost. We just don’t want noise, or a rocking/vibrating seat.
The passenger seat seems relatively simple. Involving 4 hold down bolts. The Driver seat installation is a little more complex. The drivers side seat requires a modification the the emergency brake mount. To move it out of the way to avoid catching it when the seat is swiveled.
So in our case we only ordered the passenger side swivel. Once it arrives we will evaluate its quality and functionality before we order the drivers side and start any modification with the emergency brake mount.
We purchased the following listed below. We hope to provide honest information for those of you looking. On things like installation, and whether the swivel creates vibration noise when driving down the road when not occupied. Plus any height change that is noticeable.
We should have photos soon.
Our purchase info and source is listed below.
Scopema Sprinter Seat Swivel – Passenger Side / 2019 -Up
From www.sprinterupgrades.come
Price $309.00
Shipping $26.74
Total $335.74
The Install of the swivel
We received our swivel on the day promised.
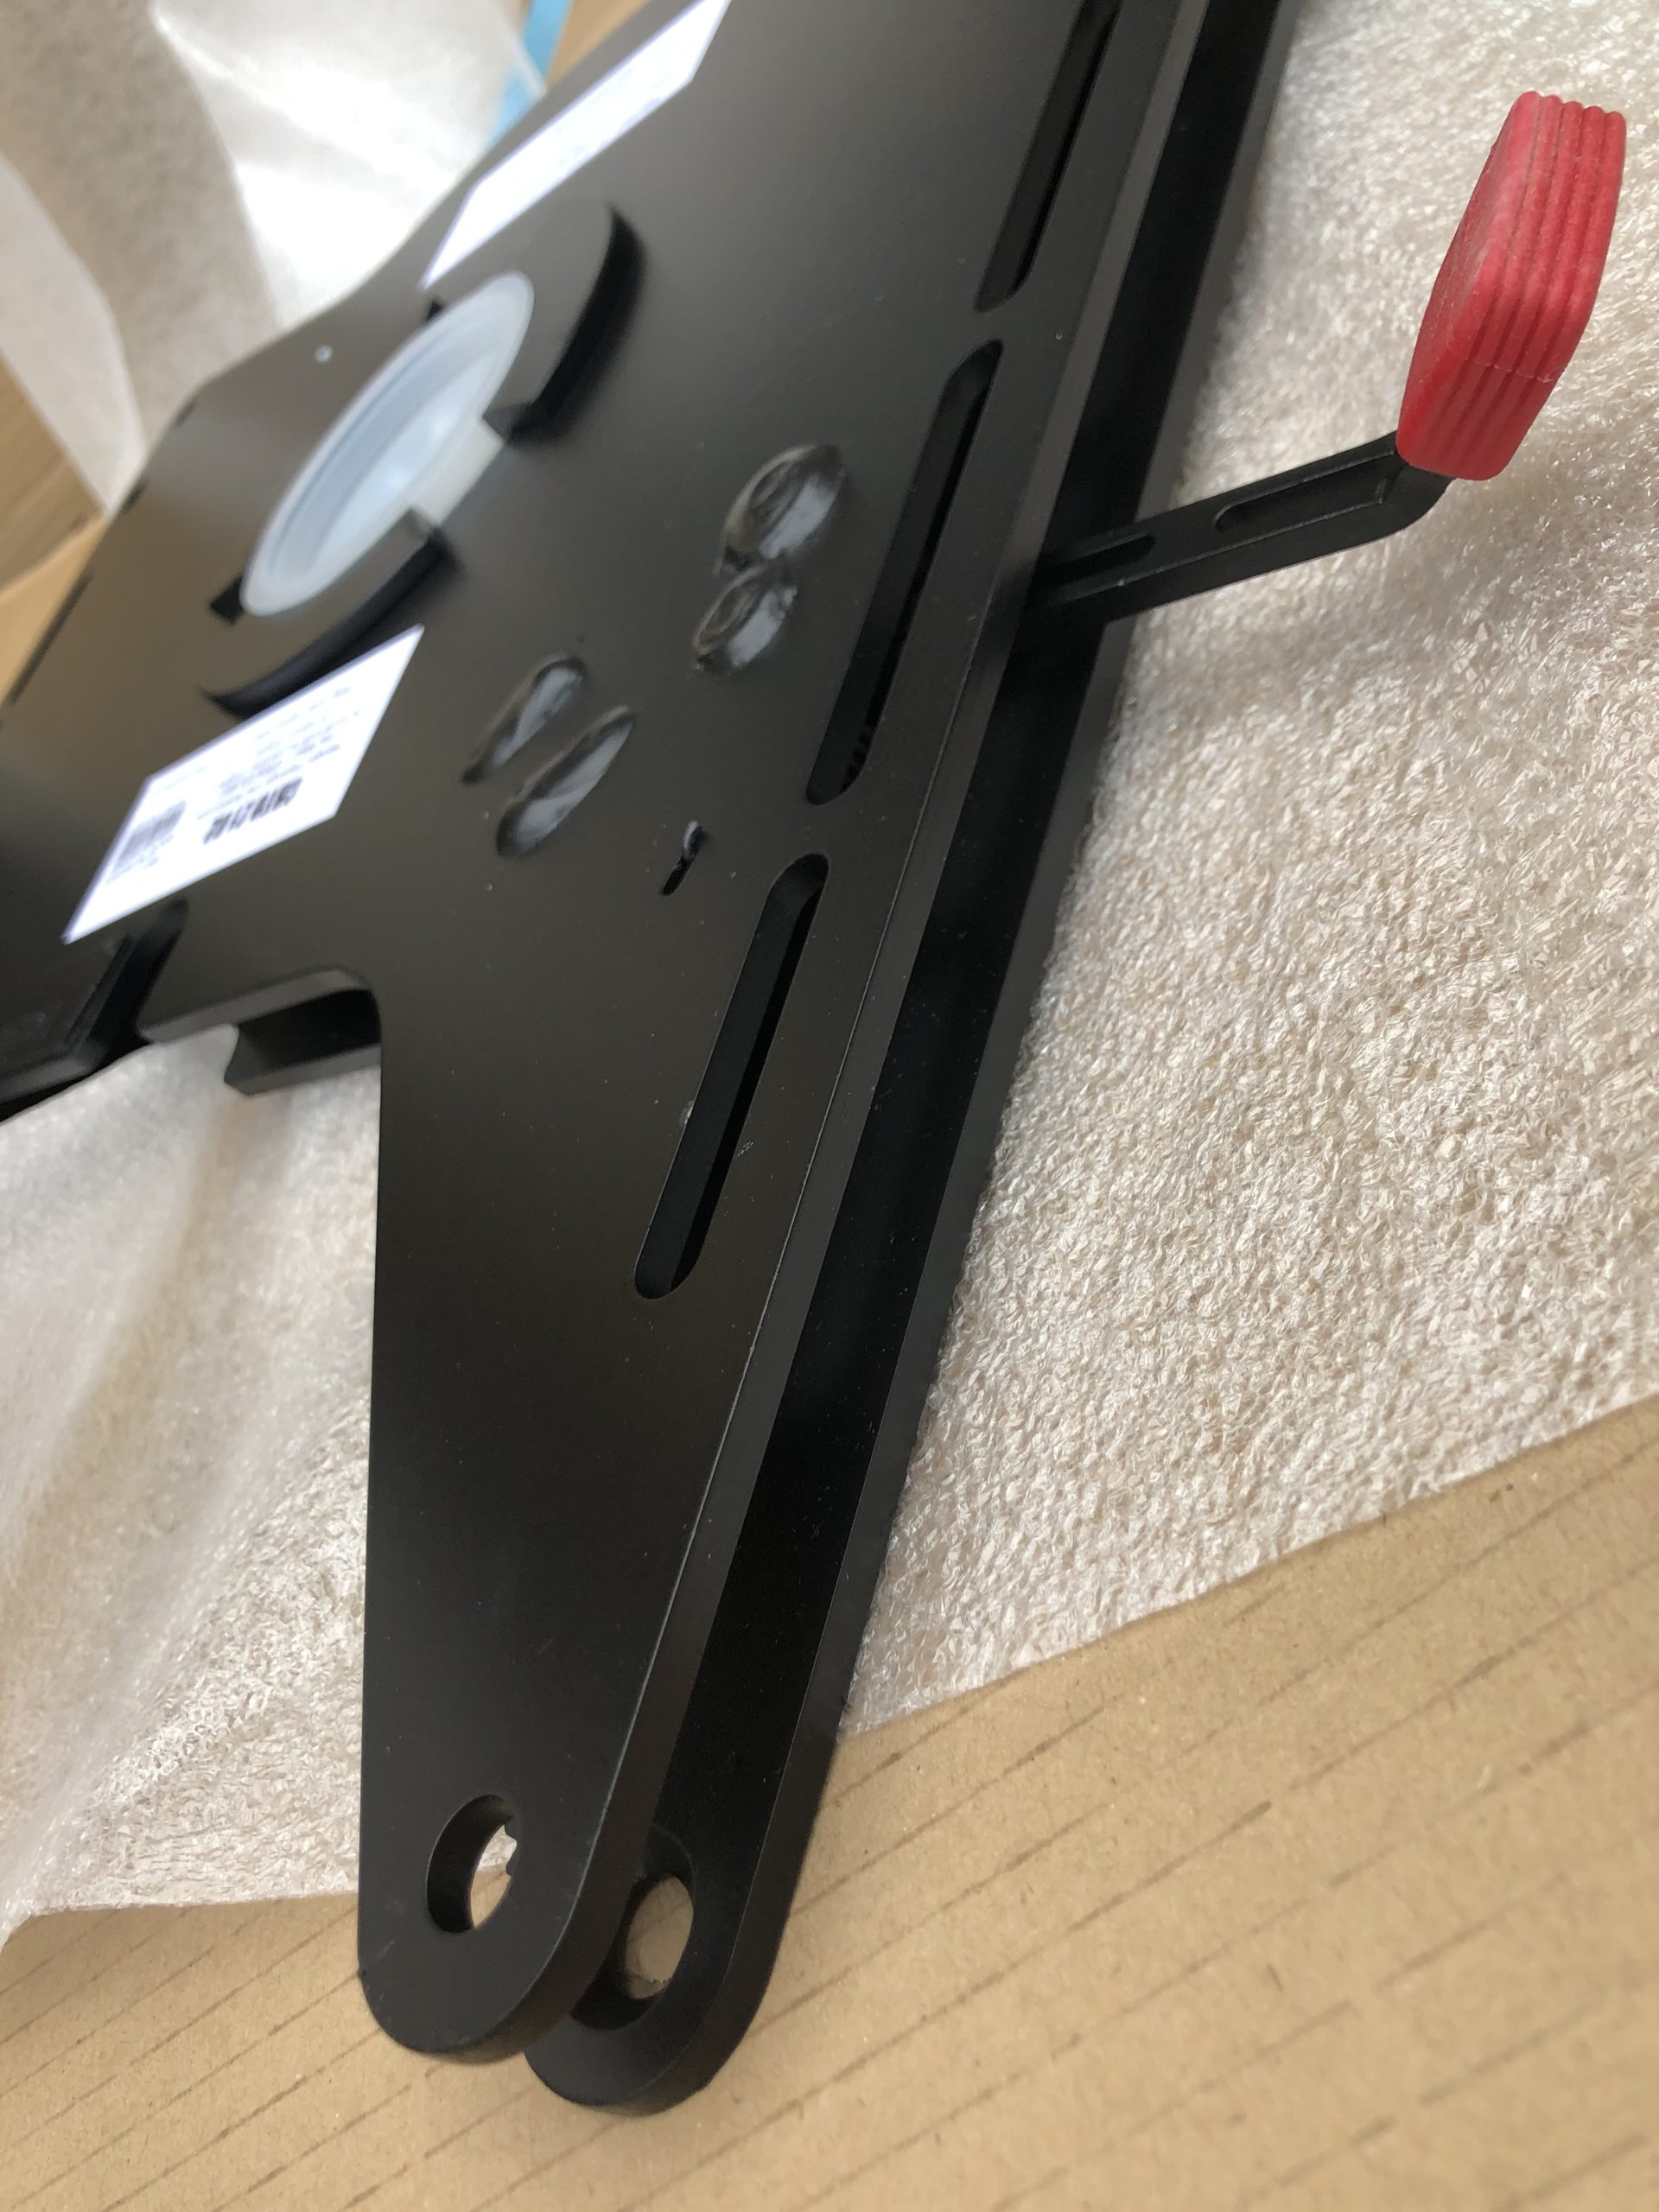
First I was surprised by the weight of the swivel. I didn’t measure it, but the thickness of the mounting plates appear to be 1/4 inch steel. Very heavy duty.
Before you start the install or start messing with your Sprinter seat in any way I want to provide a warning you need to heed!
Disconnect the Van power before messing with any seat wiring Connector!
There are detailed instructions in the vehicle manual. I thought I did everything right. But I now have to take my van to the dealer to have my SRS indicator light reset to turn it off. I am guessing that will not be free?
The manual says to wait 15 minutes after turning off the key……and so on. I don’t even have a key, just a fob. I am just saying, things could be more clear. Unlike some vehicles this fault does not seem to clear after driving it some. Or pulling the power plug and waiting again.
I don’t know if this is common on older years, or if the 2019’s and 2020’s are just so cantankerous?
Follow the directions to the letter. But know it might still happen.
I am new to the world of Sprinter Vans. The vehicle manual explains the process of disconnecting the power plug that is up under the dash. This is not something you do at the battery. I didn’t fully understand you can pull this power connector completely off the connecting post, until it is flopping around lose.
I believe my SRS issue is of my own making. I thought I had completed disengaged that connector, but had it part way on the post. Though I saw the interior lights and things go off.
After completing the swivel install, then reconnecting the power. The SRS light came on and a message in the message center, indicating a problem on the passenger side.
I am sure I didn’t damage the connector, seat, etc. I cut no wiring. The seat connector snapped back together with a click. Things seem properly connected.
But that main power connector may have made momentary contact somewhere along the install while it was lose but still partially on the post? I don’t think so, but I can’t be sure.
I thought I might be able to clear the SRS indicator by powering off again. I even waited 1 hour before reconnecting. Nope….warning light and message still on.
I have a single battery system and the battery is a PIA to get to. It is in the floor at the drivers feet location. Not under the hood.
A pain to get to. A bunch of wire connections in a confined space. My thought was to really disconnect all power from everything at the battery to reset things. But I see the potential of perhaps triggering some other electrical issue or fault. There is way too many electronics on these vehicles. Especially if they don’t re-diagnose themselves each time they are started to clear fault codes.
Do a search on the internet. Others are having this same issue.
Then I figured I might as well invest in a scanner to reset the SRS myself. After all my intentions is to eventually do the drivers seat.
That got me off on another tangent into the world of scanners and issues with newer Mercedes products. I even contacted two manufacturers.
Apparently none currently have a Diagnostic Scanner/OBD2 device that is capable of reading and resetting faults for the 2019 or 2020 Sprinter Vans. Even though several places like Amazon have devices that lead you to believe they will work. iCareSoft was one of them. So we emailed them.
If you find and confirm one that will work, we would like to hear about it. iCareSoft told us they lag about 2 years. They don’t have one for the 2019 Sprinter yet. (As of 5/24/2020). Not one that will reset SRS, ABS, and Check engine/Oil Service lights. Any listed on Amazon by them will not work for my 2019.
So that means in this coming week, I need to make a trip to the dealer. Hopefully they won’t charge me too much :-(. Since I only purchased and installed the passenger seat I may have a repeat of this when the drivers seat has the swivel installed?
On to the actual install of the swivel
The install was pretty straight forward and simple if you have the tools. Excluding the Mercedes electrical/sensor issue.
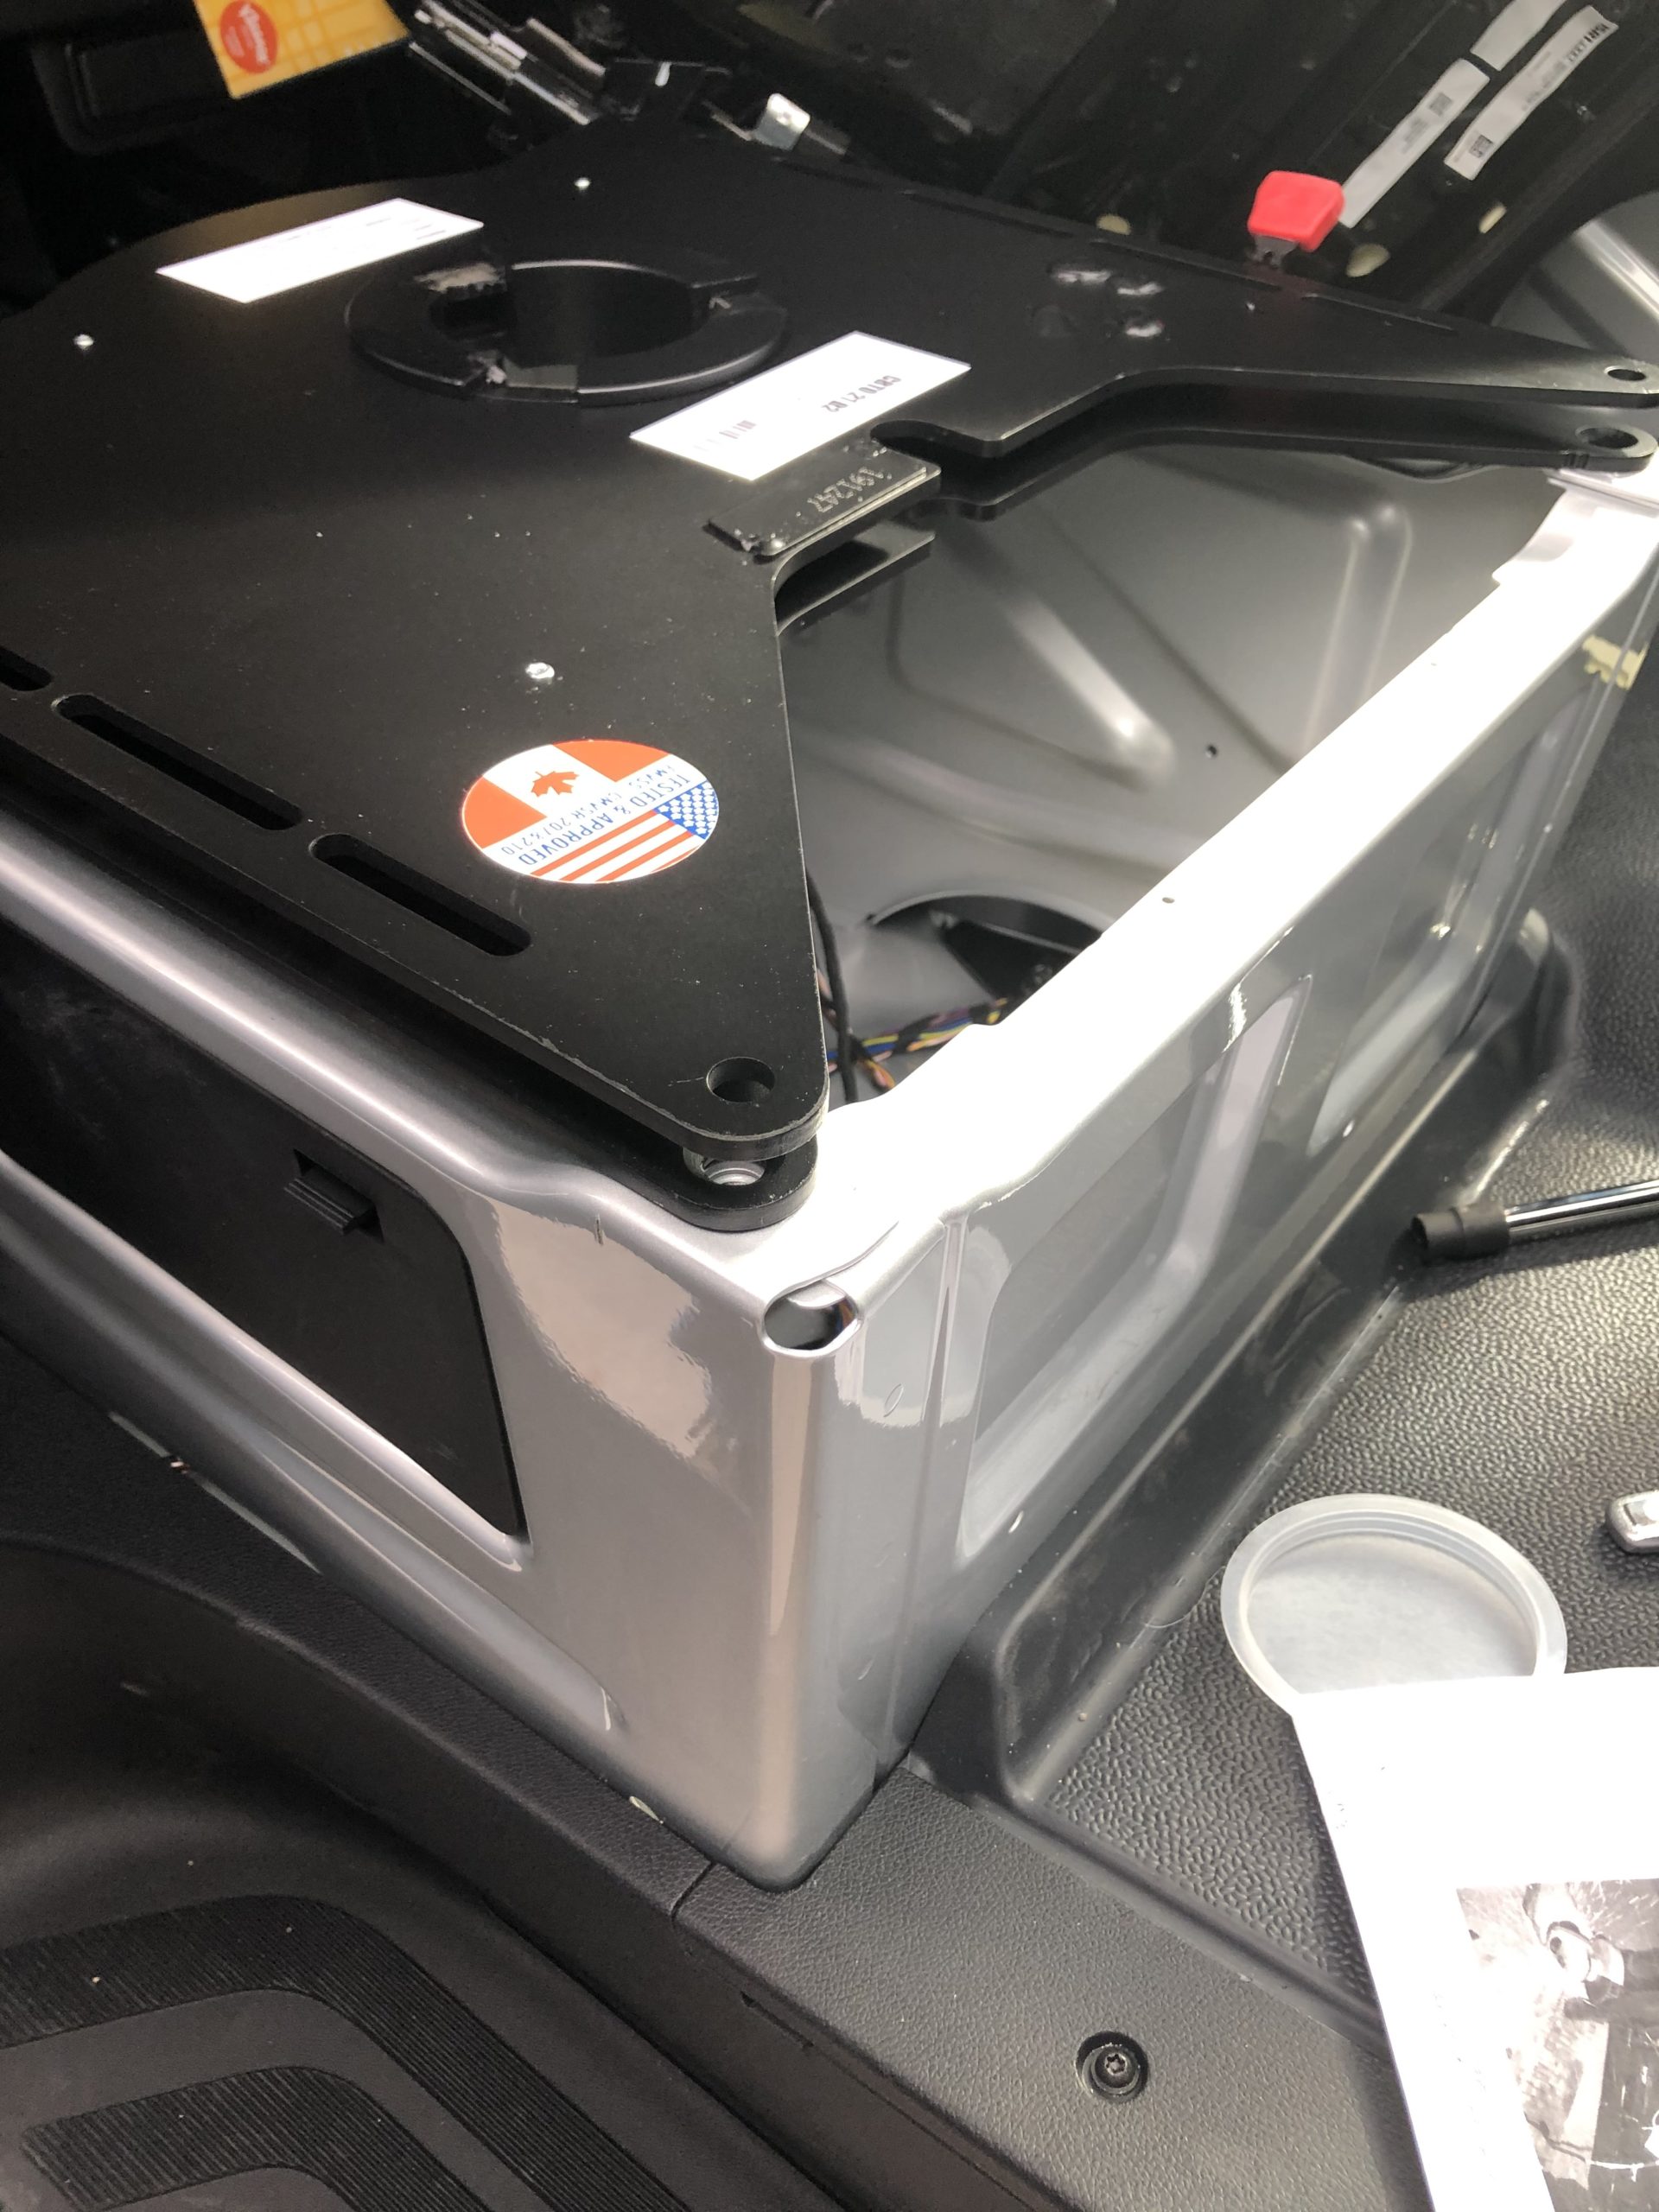
You will need the proper E-Torx socket to unbolt the seat. 4 bolts. Fairly easy. I tilted the seat back and unplugged the seats wiring harness connector. Just be careful and depress the two side plastic locking tabs and it comes out. On mine there was plenty of wiring slack.
Gently remove the seat and lay on a clean surface or tarp. Be careful you do not damage the airbag or seat belt.
Once the seat is out, you do have to shorten two line up studs on the bottom of the seat tracks. So they are only as long as the thickness of the swivel plate steel. The swivel comes with instructions for this. Just don’t cut them off flush. I used a grinder with a cut-off wheel. A hack saw and file would handle it just as well. This was all in the swivel installation instructions that come in the box.
The bottom plate of the swivel is bolted to the seat pedestal with bolts included with the swivel. The seat is bolted to the top plate of the swivel. The original seat bolts are not re-used.
You will need metric hex sockets and wrenches, metric E-Torx, as well as a metric hex key to complete all of the steps. Plus a grinder/hack saw & file.
There is a round hole in the center of the swivel that provides more than ample room to pass the wiring harness and connector through. You do not have to cut any wiring. We didn’t like the fact the wires looked like they could rub on a metal edge though. So we covered the wiring with 3/8 inch protective plastic automotive wire loom.
The whole install took about 30 minutes.
Our evaluation of the swivel
We have nothing to physically compare it too. We used other peoples evaluations and opinions in making our final selection.
In our opinion this is a heavy duty product. There is no vibration in the seat when driving down the road when not occupied.
Out of 4 brands we were comparing, this swivel added the least amount of lift or added to the overall height of the reinstalled seat.
It swivels 180° without any requirement to fold up the seat. The seat does need slide forward. The swivel only locks in the forward facing position only. It will not lock in anything but facing forward.
There is some metal to metal noise when swiveling if you are sitting in the seat at the time you are attempting to rotate it. We even applied some grease. Even with the grease that is on it. If sitting in it while rotating, the swivel also seems to be really tight, or bind some. That may go away with use? If you take your weight off the seat to swivel it, it seems to swivel more freely.
If you have a passenger van, with the first row bench seat installed, and the front seat swiveled to the rear there is not much leg room. If there were a passenger in the bench seat, in our opinion you would not really be able to use the swivel. This may also apply to a crew van configuration with a bench seat installed all the way forward?
Over all, we are very pleased with the product.
![]()