Many of us want a Conversion Trailer that has a full use shower and a toilet. Hot and Cold running water. A flush toilet.
Though I have the skills to go into a full blown custom tile job I wanted something lightweight, easy to install, and something that wasn’t going to fail on me in a year or two.
Several methods were contemplated. My first thought was using hand laid fiberglass over custom constructed walls, and sloped floor. I have done some large projects using large sheet of fiber mat or mesh, resin, and hardener. This is quite labor intensive and not as cheap as you might think. I also didn’t relish all the sanding and dealing with the dust from that.
My second thought was to purchase a shower kit. The type with a pre-made pan, and 3 interlocking finished fiberglass panels. I knew each of these 3 wall panels would have to be custom cut for height. Plus I had some odd issues like boxing out wire races and wanting to finish the ceiling in matching material. The scrap pieces I would trim off those wall panels would not provide that added material I would need.
That lead me to using FRP panels. FRP is “Fiberglass Reinforced Plastic”. I used the White 4×8 sheets .090 inches thick, with a bumpy texture similar to orange peel spray texture. I seem to recall it was called “Cracked Ice”? It is glossy finished and easy to clean. At the time the panels were available in the store at Home Depot. They do need a backer. Do not attempt to install FRP directly on studs.
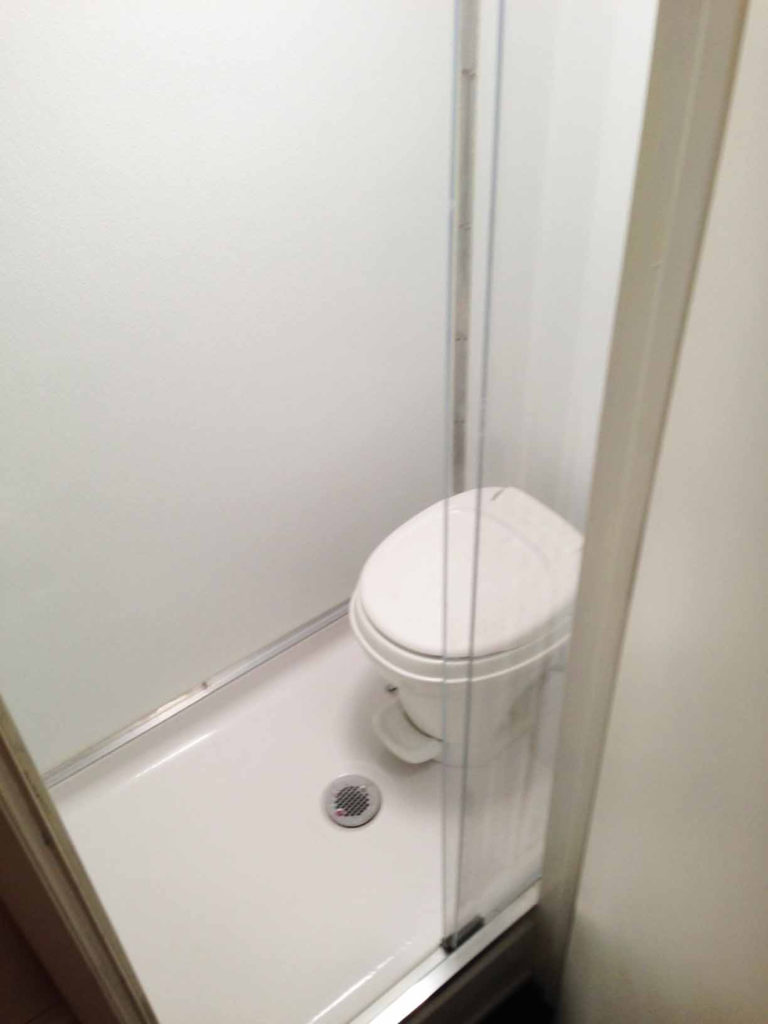
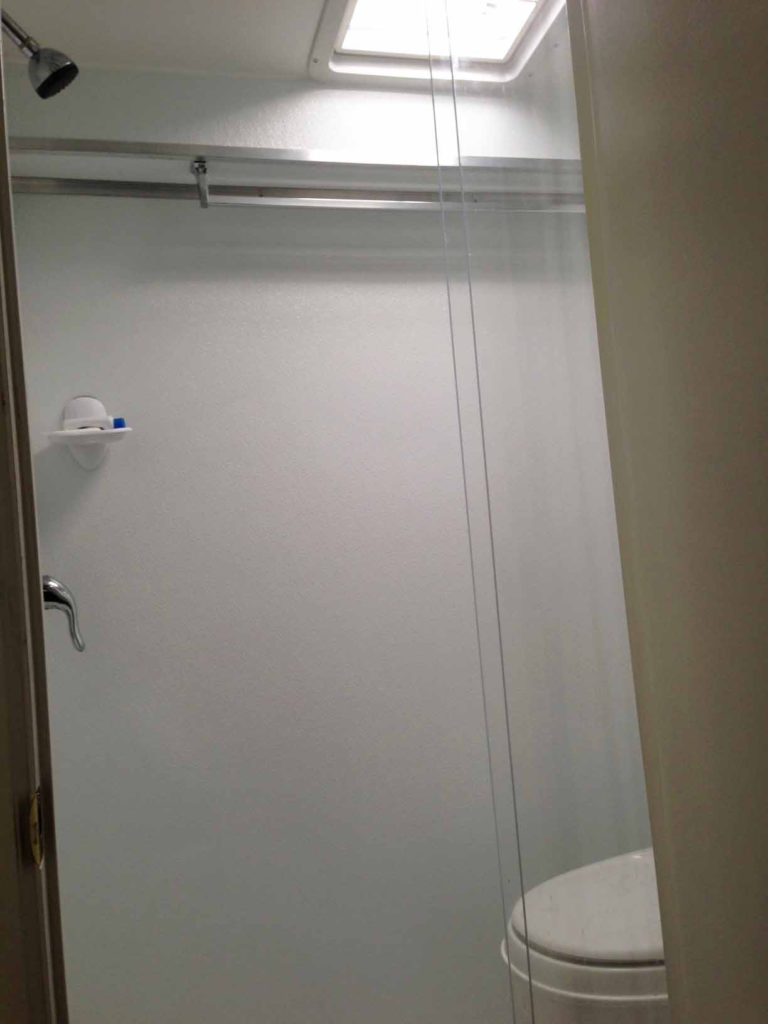
I went with a plan to use a pre-manufactured shower pan. One right off the shelf from Lowes. I was creating a Shower-Commode combo. Some refer to it as a “wet bath”. The typical arrangement found in most commercially built RV’s.
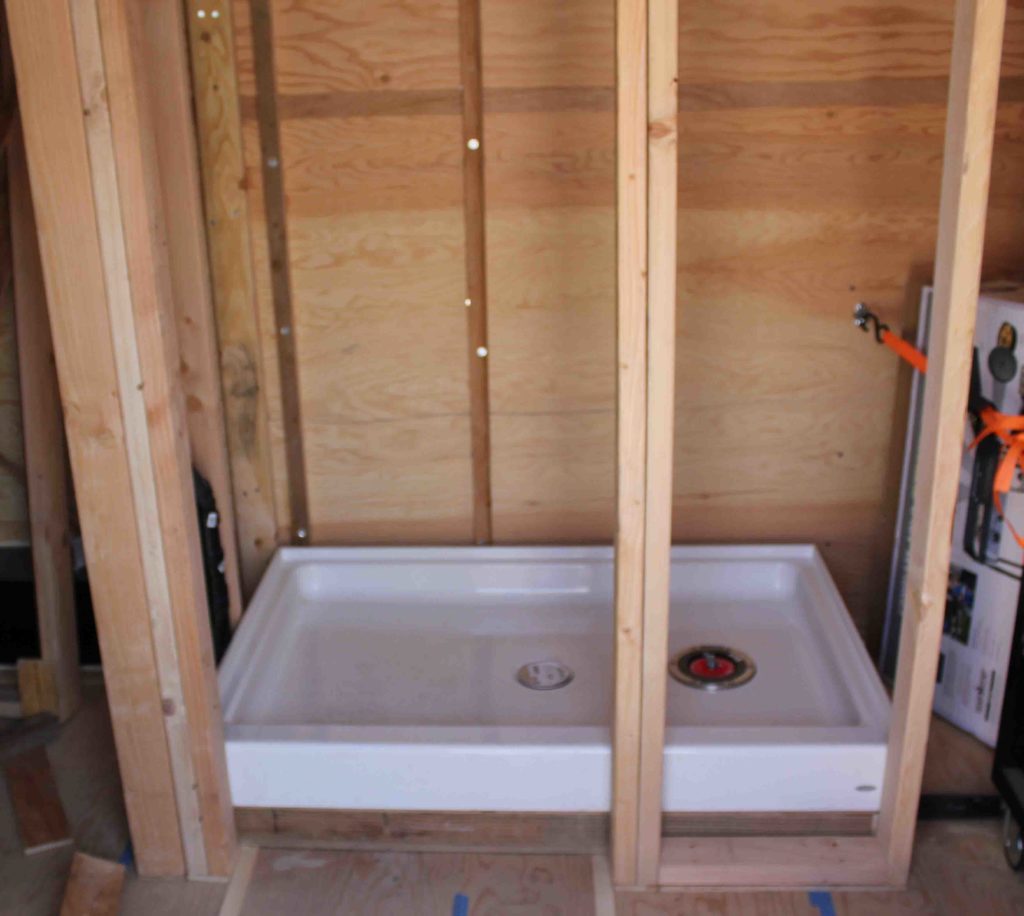
I didn’t want to be cramped so I used a 48×34 fiberglass pan. Finished in White gel gloss. I preferred the center drain design. In hindsight that proved to be ideal. They also offer one with the drain more toward one end.
I mounted my waste storage tanks as close to the front of my trailer, as the frame underneath would allow. I wanted fairly large capacity tanks. The Black and Gray tanks are 25 gallons each. They were ordered to fit between the trailer frame cross supports.
A person could just plumb drains out to standard RV dump valves. No tanks. If tanks are not an option? That would require a sewer hook up or a portable wheeled waste tank. Definitely not the configuration I wanted though.
The first problem I had to account for, was needing to move the pan about 24 inches away from the front wall. That hurt in some regards because I wanted the shower to be all the way forward.
I had to line up my toilet drop with where the Black tanks would be. My trailer tongue beams come back a ways under the trailer in a “A” frame configuration. To install the tanks I wanted, the first area between the front frame cross member, and the first cross member back, was chopped up by the Tongue A frame extension.
Click here for more info on the Waste Tanks Installation.
The shower pan area was raised with 2X4 pine, on edge [ 3.5 inches high]. This provides necessary room to run drains, vents, and hot & cold plumbing. I wanted mine above the floor for cold weather camping.
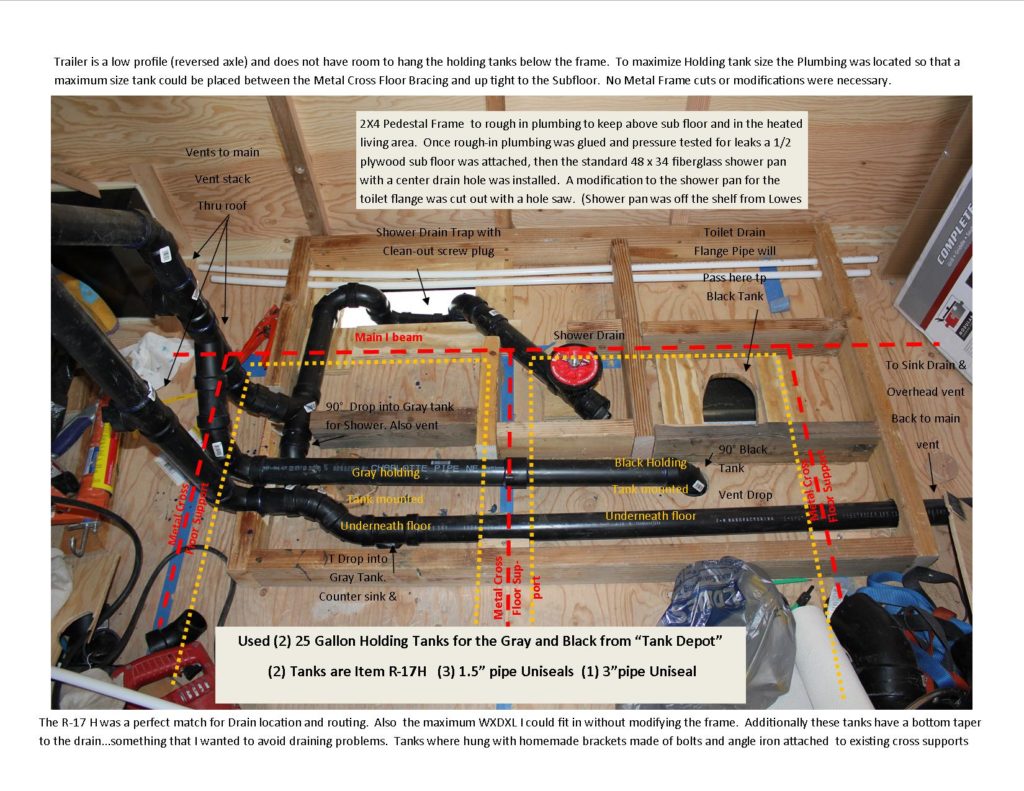
You have to pay particular attention so you create toilet flange anchoring support, via 2×4 material prior to installing the pedestal sub floor.
Other than all the tank drops, the shower drain trap was the only thing that extended below the sub floor. The fitting at the low point of that trap has a removable plug so it can be drained for winterizing. Or in the event something plugs, a small snake can be run through the pipe in either direction.
Sub floor [ 1/2 inch plywood] was installed over the raised frame, 3 1/2 inch pedestal, that the shower pan would be installed on. This involve the cutouts for the shower drain, and the toilet drop/drain.
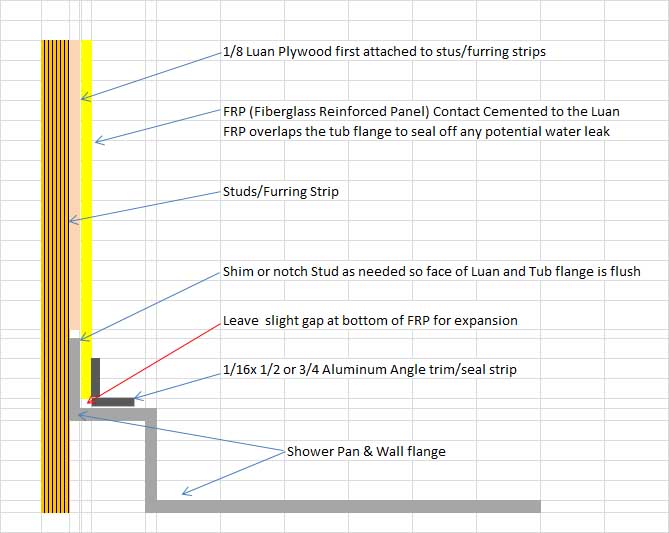
The Shower pan was installed next and attached to the furred out wall studs. Shim as needed from the studs so when the Luan is installed, its exposed face is flush with the finish pan flange surface. You want to extend your FRP panels lower than the joint between the shower pan wall flange, and the bottom edge of the Luan panel.
Hint: Do the 3 partition walls after installing the pan to the trailer wall. You have to adhere to keeping the partition studs positioned correctly to keep the installed Luan flush with the finished pan flange surface.
The Pan floor was drilled out with a hole saw, for the Commode drop that would go directly into the Black waste tank.
The two end walls were framed. As was the third wall with its opening for a door jam.
The furred out factory trailer wall was insulated between the furred out studs. 1 1/2 inch Rigid foam insulation was used. The studs/furring strips were ripped to the exact dimension as the thickness of the rigid foam. This provided substantial support/backing to the thin laun plywood that would be skinned over the foam and studs.
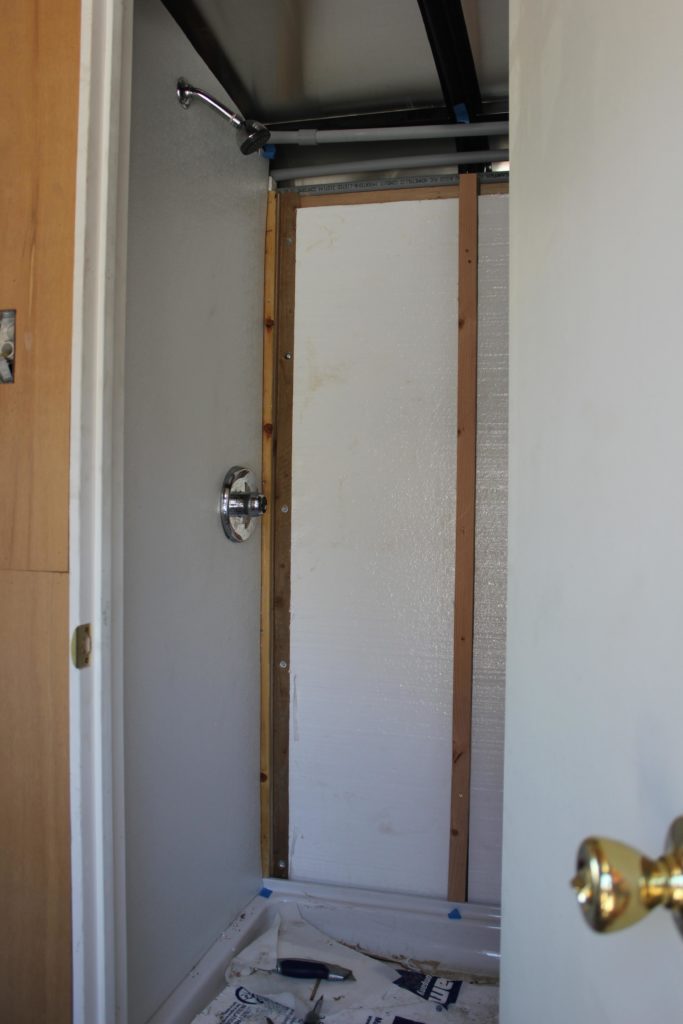
All four walls inside the shower were covered in 1/8 Luan plywood panels. Glued and screwed using construction adhesive. These luan panels are run down to the top of the shower pan flange that attach it to the studs. The luan does not extend over the flange and continue the final 1 1/2 inch or so. You don’t want that wicking water. Use screws to attach the Luan to the studs, about every 12 inches. Bury the head in the luan.
Cut and dry fit all your FRP panels. Cut just shy of 1/16 inch all sides to allow for expansion. These are cut longer than the Luan, meant to extend past the top of the pan flange, and nearly touch the top of the finished curve on the upper side of the pan.
Mark your stud locations on your shower pan with tape. Also your stud locations with tape at the ceiling.
Once all the FRP panels have been dry fitted, the Luan walls, and the backside of the FRP needs coated with contact cement. Allow that to dry until only slightly tacky per the contact cement instructions. If you have never used contact cement before you may want to practice first on some scrap.
You have to completely cement the luan, and completely cement the back side of the FRP. Glue and FRP one wall at a time. Once the contact cement is tacky dry you should be able to gently place butcher paper or newspaper on the luan walls. Don’t press it hard. If it is sticking real easy, or too much, your cement is not dry enough. The paper should just hang there and pull off real easy.
Cover the entire cemented luan wall (now real tacky dried) with paper. Leaving 6 to 10 inches of paper extending past all edges of the wall. Position your FRP without applying too much pressure. This step may require two people. Slip a section of paper out of the top. While insuring your FPR is properly in place, press the cemented FRP up against the cemented Luan. You won’t get a “do over” if you mess this up!
Try to only make glue to glue contact away from any of the remaining paper, or you may pinch the paper in place and it will not slip out. If you have bonded the FRP to the Luan at the very top, even just an inch or so the FRP should hang in place. Continue from the top down and slip the remaining paper out. Gently pushing the FRP slightly to bond it to the Luan, as you go…. without creating ripples. Remember not to push and bond anywhere near any remaining paper that is sandwiched in between the Luan and FRP.
Once all the paper has been removed really push every square inch of the FRP to bond it to the Luan. At this point I usually have 1/2 inch or 3/4 inch plywood cut just shy of the size of the wall. I then block this at multiple places, off any support or wall you can use. The objective is to apply pressure against the FRP by wedging the blocks as needed. Let it dry overnight.
Any of my corner seams are silicone caulked using white caulk. Over that I trim it with 3/4 x 3/4 x 1/16 aluminum angle. I run stainless screws into the corner. One close to the top, to the bottom, and one in the middle. I do this while the silicone is still wet. Clean up anything the oozes out.
Around the bottom of the FRP that is sitting a the top curve of the pan I use the same technique. Silicone, angle and screwing through vertical side of the angle. Hope you marked your stud locations with tape on your pan? You want those screws in the studs, not just in the luan.
Continue as needed on boxed out areas, ceiling, etc.
![]()